Tuesday, December 22, 2009

what is a parallax error?

Parallax error is the error that is most committed when readings are taken in physics. You can thus understand why it is important to avoid it at all cost. One must be aware of its existence at all time so that it can be avoided and as a result the true value of the reading is obtained.

The concept of parallax error is related to the term parallax.

Imagine that we have  in a room a pelican and a flamingo as shown in fig 1 below.

clip_image004[10]

Fig 1

Now Garfield is moving about in the room and each time is is somewhere in the room, he looks at the two birds. At the point A he sees the flamingo on the left of the pelican whereas when he is at position C he would see the flamingo on the right of the pelican. Only when he would be at position B would he sees the two birds one behind the other.

He would discover that each time he is at a different position, he would find that the position of the flamingo relative to the pelican has changed.

You can also have this effect when you are in front of a clock. If you move from side to side you would find that the time that you can read from the clock is different. 

So we can the understand that the parallax is the change in the apparent position of an object when the position of the observer changes.

Now let us look at the concept of parallax error. If you have placed a pencil on a metre rule and you are reading its length then just like in fig 1 above and in fig 2 below you can place you eye everywhere you want.

clip_image002[13]

Fig 2

As you can see from fig 2 above I have chosen three position at which you can place your eye.

Clearly at these three position we can have the following reading

Reading at A  = 6.2 cm

Reading at B  = 5.8 cm

Reading at C = 5.5 cm

What you you think would be the correct reading?

The correct reading is would be obtained when the eye is placed at B.

clip_image002[15]


Fig 3

Now there is a line from the tip of eye to the of the pencil  that continues up to the scale. this line is called the line of sight and the mark at which the line intersect the scale is the length of the pencil. This line of sight must be be at right angle to the scale. This is shown above in fig

If the line of sight and the scale are not ar right angle to each other then a parallax error is committed.

Similarly with a measuring cylinder the line of sight from the eye to the bottom of the meniscus must be at right angle to the scale as shown in fig 4 below. In this case the line of sight is horizontal and the scale vertical.

clip_image001


Fig 4

So as you can see above each time you are taking a reading you must ensure that the line of sight is perpendicular to the scale.

What is a zero error?

We have seen in a previous post what an error is. I am now going to talk about the zero error.

As the name suggest the error has a relation with the zero mark on a scale.

As you can see in fig 1 and fig 2 the scale on a measuring instrument can be either straight as on a meter rule or circular as on an ammeter.

clip_image001[3]

Fig 1

clip_image001[5]

Fig 2

Straight scale

Now when you measure using such instruments it is necessary for you to pay particular attention to the zero mark. If you are using a metre rule then one end of the object must be placed on the zero mark as shown in fig 3 below.

clip_image001[9]

Fig 3

However some measuring instruments have the the zero mark that start slightly inside like in the second diagram in fig 3 above. Be careful.

Now if the object is not place on the zero mark as shown in fig 4 below then a zero error is committed. 

clip_image001[11]

Fig 4

Can you read the scale and tell me what is the length of the object?

Now as you can see the  object is not placed starting on the zero mark. It is place on the o.2 cm mark. This 0.2 cm mark is the magnitude of the error. As you can also see the object’s other end is on the 2 cm mark. Since the other end of the object is not place on the zero mark, the length obtained will be greater that the true value.

Hence the length of the ruler = 2.0 – 0.2 = 1.8 cm

It is important to identify the magnitude of the error and then to  remove it from the reading with the error to get the true reading.

Circular scale

When there is a circular scale, there is always a pointer like you can see on an ammeter or voltmeter. Now if you want to have the correct reading it is important for the pointer to be on the zero mark before it is used. If the pointer is not initially on the zero mark then a zero error would be committed.

clip_image001

Fig 5                                                                      Fig 6                                                       

In fig 5 above you can clearly see that the pointer is on the zero mark before use, and as a result there is no zero error and the correct reading from fig 6 is 0.8.

Let us look at two examples where the pointer is not initially on the zero mark.

clip_image001[5]

Fig 7                                                                            Fig 8                                             


In fig 7 the pointer is not on the zero mark before use. So in this case the solution is to adjust the pointer until the error is removed. If that is not possible then the magnitude of the error needs to be determined. In our example the the magnitude of the error is 0.3. Hence all measurement taken with this apparatus will be greater by 0.3. After the meter is used the reading is o.8. Then adjusted for the error

The true value = 0.8 – 0.3 =0.5

clip_image001[6]

Fig 9                                                         Fig 10                                                    

In fig 9 the pointer is on the left side of the zero mark. The magnitude of the error is 0.2. But as you can guess when the meter is in used the reading obtained will be less than the true value. Hence the reading from the meter in fig 10 is smaller than the true value and as a result the magnitude of the error must be added to the reading. Hence

The true value = 0.8 + 0.2  = 1.0

Monday, December 14, 2009

How to determine uncertainty in derived quantity when multiplication or division is performed

This is the second part of a series of post on finding uncertainty in derived quantities. You can find the index here and the part on addition and subtraction here.

Now very often when you performed an experiment you meet quantities that need to be processed to obtain a derived quantity such as g, the acceleration due to gravity, or any other derived quantities.

You have already seen the first part on addition and subtraction and now you will see how to do it for multiplication and division.

If in an experiment is performed and the following quantities are measured with their uncertainties.

A = 10.2+-0.2 cm

B = 5.4 +-0.4 cm

Now if you need to process these quantities to find AB and A/B with their uncertainties how would you do it?

Uncertainty in multiplication

How would you determine the value of AB and its uncertainty?

You will have to calculate the value of AB first.

AB = 10.2 *5.4 = 55.o8 =55 (2 sf )

To determine the uncertainty in AB you will have to use the equation below.

formula for uncertainty multiplication

Rearranging the equation will give you

uncertainty in mutiplication

Hence AB = 55+-5 cm2

Remember the uncertainty in A and B are to 1 sf hence the uncertainty in AB must be given to 1 sf.

Uncertainty in division

You are now going to determine the value of A/B and its uncertainty.

You will have to determine the value of A/B first.

A/B = 10.2 /5.4 =1.888 = 1.9

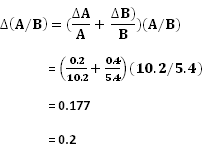
To determine the uncertainty of A/B  you will determine the equation below

image

Rearranging the equation will give you

image

Remember the uncertainty in A/B is given to 1 sf since the uncertainties in A and B are given to 1 sf.

Hence A/B = 1.9 +-0.2

With these two formula you can thus determine the uncertainty in any derived quantities that involves multiplication and division.

Now you can move to the next part where the method to determine uncertainty of derived quantities where powers,  square root, etc are involved.

Moment and couple


Moment

We have when earlier that a force acting on an object causes work done. Here we are going to see that if a force act on an object the a rotation can occur.

Let us look at some examples. You will see that if the force act on an object in a certain way the object would undergo a rotation about a centre of rotation.

Example 1

clip_image001

In this example a footballer would kick the ball and the ball would rotate about the centre of the ball the centre of rotation.

Example 2

clip_image001[10]

In this example a person is opening a door by exerting a force on the door handle. The door will thus rotate about the hinge of the door.

So we can thus say that the moment is related to the turning effect of a force.

We are now going to have look at how the moment of a force is calculated.

clip_image001[12]

In the diagram above we have the force F that is applied on the door handle. 

The force is applied on the handle and the point on the object where the force is applied is called point of application of the force. The distance between the point of application of the force and the pivot is the distance d.

Note that the force must be at right angle to the distance d as shown in the diagram below. If it is not at right angle as shown in the second diagram below then the component of the force that is at right angle to the distance must be determined. In the case of the second diagram below the component of the force that is at right angle to the distance is Fcosθ

clip_image001[16]

clip_image001[12]


We can now return to the diagram shown above, and we can say that the moment can be calculated as shown below.

Moment = Force * perpendicular distance from point of application of the force to the pivot

If the force is at right angle to the distance then

moment = F *d

If the force is not at right angle to the distance then

Moment = Fcosθ*d

          = Fd cosθ


Couple

A couple is when two forces of equal magnitude but acting in opposite direction on an object causing a rotation.

The best example is the car steering wheel or the handle of a motorcycle. As the diagram below shows two forces that are equal to each other in magnitude but acting in opposite direction act on an object. The point of applications of the two forces are separated by a distance d.


clip_image001[18]   Hence the couple can be calculated using the equations below.

Couple = Magnitude of one of the two forces * the distance between the point of application of the two forces

couple = F* d

Of course the same principle  will apply to couple if the forces are not at right angle to the distance. Then the component of the force at right angle to the distance must be used. The couple will then be calculated using the equation

couple = Fd Cosθ

Volume and volume of regular objects

The volume of an object is the space that the object occupies.

It is a scalar quantity and its SI unit is the cubic metre (m3)

The unit for the volume of object can also be derived from any other unit for length such as the cubic centimetre, cubic kilometre, etc

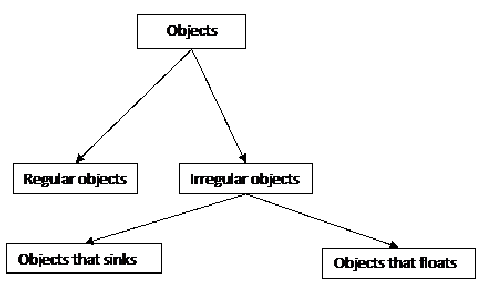
We are now going to see how the volume of an object is determined.  The method to determine the volume of the object depends on the nature of the object as shown below.

clip_image001

Volume of regular objects

Regular objects are those that have a plane of symmetry. It simply mean that if the object is cut along the plane of symmetry then the two parts will be similar to each other with the same volume.

The volume of regular objects is determined by measuring the dimensions of the object and finally using using an equation. The following are different regular objects and the equations used.

Cuboid

clip_image001[5]  

clip_image002

Cube

clip_image001[7]

Volume = length * length * length

            = L3

Since all the sides of the cuboid are of equal length.   

Sphere

clip_image001[9]

clip_image002[6]

since r = d/2 then

clip_image002[10]

clip_image002[8]

As you can see all regular objects are determined by measuring the dimensions and then using equations to determine the volume. I would try with time to add as much of regular objects and their equations. If you require the equation for any regular shape then leave message in the comments below.

What is an error?

As we have seen in an earlier post, a physical quantity is a property of an object that can be measured with a measuring instrument.  Hence when you use a measuring instrument you would obtain a reading. The reading is simply a numerical value that you can read off a measuring instrument such as the volume off a measuring cylinder or the time off a stopwatch.

We must also introduce what is called the true value. The true value is the reading that you would obtain if the measurement is done in ideal conditions.

In order to obtain the the true value the following conditions must be present:

  1. You must have the skills to use the instrument and know the steps that must be followed to obtain the reading.
  2. You must be using instruments that are properly calibrated and are not damaged.
  3. All the conditions that are required to obtain the true value must be present. For example 1/3 of the stem of the thermometer must be immersed in the liquid, the pressure must be one bar, the liquid used in the measuring cylinder must have a temperature of 200C.
  4. If a calculation is needed to determine the magnitude of a physical quantity, then the correct equation and the right constant must be used.

Now an error is made when the reading that you obtain is not equal to the true value.  And the magnitude of the error is the difference between the reading obtained and the true value.

Then we can thus introduce the term accuracy and precision.

A measurement is accurate if it is close to the true value. And if there are two values then the one that is closest to the true value is the most accurate.

The precision of an instrument is the smallest value that can be measured using the instrument. Hence if a length is measured using a metre rule then it is precise to 1 mm or it has a precision of 1 mm. However a length that is measure using a vernier caliper has a precision of 0.1 mm. Hence the length that is measure using a vernier caliper is most precise.